
Do you know that social media is a great resource for networking? Not only do the social sites allow for you to connect with people, worldwide, but also builds your business. How? Let’s go through Facebook, one of the popular social sites,
Facebook is a wonderful place for people who want to build a fan base. You do this by signing up (it’s free) and creating a business page. To do this, first go to Facebook.com/pages and click “Create Page” in the upper right hand corner. In the drop down menu, you need to choose a category. You would choose Brand or Product. Click on the Facebook terms and conditions. Facebook will walk you through the set up the process. It is my suggestion for you to link to Twitter from your Facebook by going into their settings and link their Facebook page to your Twitter Account to save time and allow you to be more places at the same time. Once your Facebook Page is set up, it is very important for you to post.
You will see a screen appear that will ask you to select a category from the following list:
- Local Business or Place
- Company, Organization or Institution
- Brand or Product
- Artist, Band or Public Figure
- Entertainment
- Cause or Community
Fill in your information.
Once you select the category for your business, you can fill in the name, address and phone number. Check the box next to “I agree to Facebook Pages Terms” and click “Get Started.” You’ll see a Page that will ask you to confirm your Page Category and be able to update the category you chose.
You will need to add an jPeg image. Be sure it is a good photo taken by a professional. Having no photo is unacceptable looks like you’re a bot. Please take note that FB will only allow (properly apply) profile photos that are 180 pixels wide.
Invite your friends, tell your fans, post status updates often, and suggest your page to friends. You can do this under “Find Friends.”
Upload a picture for your page cover. It can be a logo, a photo of a store or a photo of a person – whatever makes the most sense for building your brand. The file needs to be smaller than 4MB, and it can be square or a vertical rectangle. Choose an image that isn’t square. The max size can be 180 x 540 pixels and try to use all the space available to include a logo, photo and perhaps a tagline or some descriptive text. There’s no reason to confine yourself to using a square image just because you’re worried about how the thumbnail will look. Once you upload a photo you simply use the “Edit Thumbnail” option to select a square portion of the vertical banner that works best for the thumbnail. Your banner may have to been cropped to select the top portion with the text logo.
Begin your Page started off with some “likes” by recruiting your own friends. Start typing in names and when you drag the cursor over someone’s name, it will highlight in blue. Click once to check the person and add them to your invite list. Click “Selected” to see who’s on your invite list. When you’re ready to invite, click “Send Recommendations.”
You can also “Import Contacts” from your mailing list on various email accounts. You do this by uploading a contact file from an email account. Click on “Import Contacts” to reach out to your email contacts about your new Page. You can upload a file (Outlook, Constant Contact are examples) or you can enter your email login info so Facebook can access people in your email contact list. Check the box next to the names you’d like to invite, and you can preview the invitation to see what it’ll look like. For people who are already on Facebook, they’ll get a “Recommended Pages” widget on their Facebook, while everyone else will get an email sent to them. Next is a sample of an email your prospects will receive:
Your company name is inviting you to join Facebook. Once you join, you’ll be able to connect with YOUR PAGE, along with other people you care about and know.
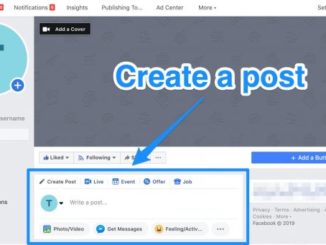
Then, begin writing once you have some fans.
For status updates, you can either share with everyone or you can target by location or by language. Targeting comes in handy if the page is for a business with several locations in various states, especially if there is a contest, event or update that is only for a particular city.
To post a link the proper way, click “Link” and paste the URL. Click “Attach.” Once you “attach” the URL, you’ll see that the text and photo from the page you’re linking to will populate automatically. You can change the title, paste different text into the snippet, and change the pictures (if there are several options, indicated by the “Choose a Thumbnail” prompt):
This is the best and cleanest way to link to another page. The post looks better and it will perform better if the link is attached instead of typed in to the status.
Once you have 25 fans on your Facebook Page, any of a page’s admins can reserve a vanity URL. Go to the User Name page, select the Page name from the dropdown menu and then write in the name you’d like to use. Click “Check Availability.” If it’s available, a prompt will ask, “Are you sure you want to set [URL] as [Facebook Page]’s user name?” If so, confirm to lock in that URL – and keep in mind that you can’t change the URL for a Page once you confirm.
Facebook Insights is a great tool that can help you figure out when to post and what kind of content does well. You can keep watch your activity by clicking “Facebook Insights” on the right sidebar, just below the admins tab.
In the “Admins” section of the sidebar on the right, click “See All.” A new page will appear with the names of the admins. To make someone else an admin, just type in their name (it’ll come up in real time.) There is no limit to the number of admins a page can have. Admins are kept in touch about what does on the page, including comments and posts so that your company can interact with its fans, via email.
A full 180 x 540 pixel sidebar is impressive and provides a bigger “canvas” with which to convey our message. There’s more room for creativity. Cut off logos can be avoided by little adjustments in the positioning of the logo within the sidebar.
Once you’ve set up the Page, the interface changes if you’re looking to import/suggest. On your Facebook Page, click “edit page” (top right) then “marketing” then tell your fans.
Facebook is definitely going to be playing a larger and larger part in the future for businesses, especially small ones
This article was written by Dr. Joyce Knudsen, Ph.D., AICI CIM, a leader in the field of communications, a published author and originator of home study program, worldwide.
Proudly WWW.PONIREVO.COM